How to Sew the Blanket Stitch: Add a Decorative Touch to Your Projects

Blanket Stitch: A Beginner’s Guide
The blanket stitch is a versatile and decorative stitch that’s perfect for finishing fabric edges and adding a touch of flair to your projects. It’s a great stitch for beginners because it’s easy to learn and produces professional-looking results.
Step-by-Step Guide
Step 1. Start by threading your needle with a suitable thread and knot the end, making sure to leave a short tail of thread after the knot – this prevents the knot from coming undone.
The type of thread you use will depend on the project you are working on. For example, if you are sewing a delicate fabric, you will want to use a fine thread. If you are sewing a heavier fabric, you will want to use a thicker thread.
Step 2. Prepare your fabric for sewing. You can use sewing pins to temporarily keep two pieces of fabric together while stitching them. You can also mark your fabric with a pencil or tailors sewing chalk, or draw a guideline with them for sewing the thread.
Step 3. Start the stitch in between the two layers of fabric (if stitching two pieces of fabric together) – this will neatly hide the knot in between the pieces of fabric after sewing. Bring the needle up through the fabric, slightly away from the fabric edge where you want to start your Blanket Stitch. Make sure to leave a long tail of thread at the end of the needle so that you can secure the stitch later.
Next, you want to anchor or secure the thread on to the fabric before you continue stitching – this will prevent the thread from unravelling. To do this, take the needle back down through both pieces of fabric – close to where you came up, and pull it through the other side. Then, take the needle back through the fabric again – close to where you came out. Once done, the thread will be anchored to the fabric.
Step 4. Hold the thread tails down with your thumb or finger to secure them in place. This will help to prevent the thread from knotting as you sew.
Step 5. Bring the needle back down through the fabric, close to the fabric edge, forming a straight stitch.
Step 6. Without pulling the thread too tightly, bring the needle up through the fabric, a short distance away from the first stitch.
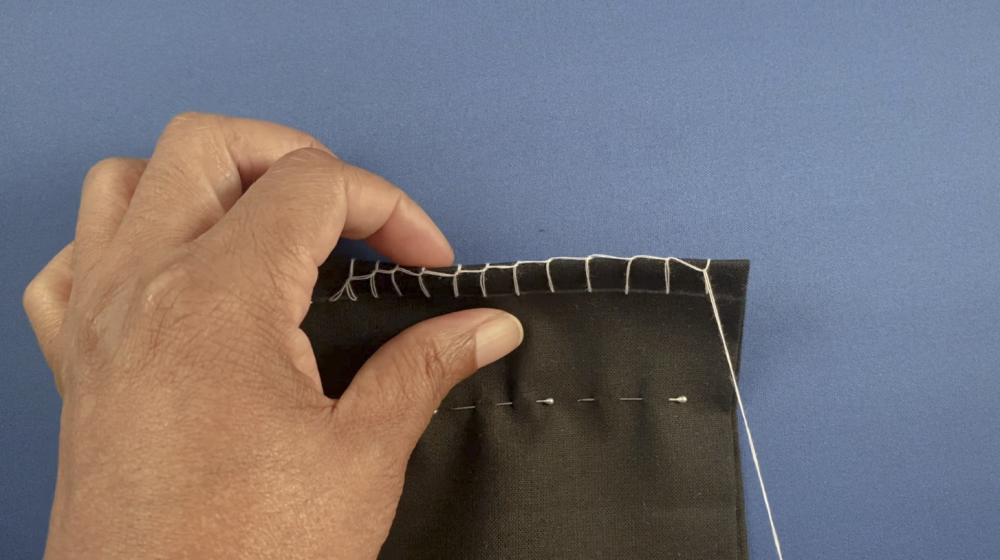
Step 7. Bring the needle over the top of the straight stitch, from right to left, forming a loop. Make sure that the loop is the same size as the straight stitch.
Step 8. Insert the needle through the loop from left to right, creating a knot around the straight stitch. Pull the thread gently to secure the knot.
Repeat the process, spacing the stitches evenly along the fabric edge, creating a decorative scalloped or straight line.
Step 9. To secure the stitch, create a small backstitch or make a knot at the end of your stitching line. To do this, take the needle through the fabric, close to your last stitch, and pull it through to the other side. Bring the needle up through the fabric – again, close to where you last came through. Then, take a small stitch at the top layer of the fabric (not going through to the other side) and slowly pull the needle through until you see a small loop at the end of the thread. – do not pull the thread all the way through.
Gently take the needle through the small loop, and pull some of the thread through. Take the needle through the loop again, and pull the thread all the way through until the knot is secure. Finally, run the needle behind a couple of the stitches, in between the two layers of fabric, and pull it out at the end of the second stitch. Once done, you can cut the thread as close to the fabric as possible – this will leave a neatly hidden small tail at the end of the knot to prevent it from becoming undone.
Tips for the Blanket Stitch
Use a contrasting thread: This will make the stitch stand out.
Keep your stitches even: For a neat finish, try to keep your stitches the same size.
Experiment with different stitches: You can create different effects by varying the size of the loop or the spacing between the stitches.
The blanket stitch is a simple yet effective stitch that can add a finishing touch to any project. With a little practice, you’ll be able to master this versatile stitch and create beautiful, professional-looking work.