The Seam Ripper: Your Guide to Perfect Unpicking

Mastering the Seam Ripper: Your Sewing Saviour
Right then, let’s have a proper chat about that little tool that’s both a lifesaver and, let’s be honest, sometimes a reminder that we’re all human – the trusty seam ripper! Or stitch ripper, as some folks call it. Seriously, even if you’re trying your absolute best to sew everything perfectly (and who isn’t?), those little ‘uh-oh’ moments just creep in sometimes, don’t they? I’ve definitely been there, and I bet you have too! And when they do, this little gadget? It’s going to become your absolute favourite. In fact, you might want to grab a couple because, honestly, they have a funny habit of going walkabout just when you need them most!
So, in this post, we’re going to take a good look at how to use a seam ripper properly, covering all sorts of handy ways you can use it. Think of this as your friendly guide to unpicking like you really know what you’re doing! Now, at its heart, this tool is basically a super-precise way to snip threads. Yes, its main job is to take out stitches – maybe you made a little whoopsie, or perhaps you’re tweaking something to fit just right – but you’d be surprised at how many other times it can come to the rescue. And the golden rule? We want to get those stitches out without hurting your lovely fabric. So, even though it’s called a ‘ripper’, there’s actually not much ‘ripping’ going on at all!
Understanding Your Seam Ripper
Right, before we get stuck into actually using this clever little tool, let’s have a quick peek at its bits and bobs. Knowing what each part does will really help you get the hang of using it properly.
- The Handle: So, first up, you’ve got the handle. Pretty straightforward, this is where your fingers go! It’s designed to give you a good grip so you can keep everything nice and steady.
- The Point: Then there’s the point. This is the really sharp bit at the end. You’ll use this to carefully nudge under those individual stitches you want to get rid of. It’s like a little detective, finding the start of the thread.
- The Red Ball: Next, see that little red ball? That’s actually quite handy. It’s great for scooping up those looser threads, and because it’s rounded, it’s a bit gentler on your fabric, so you don’t have to worry as much about accidentally snagging anything.
- The J-Curve: And finally, you’ve got the J-curve. This is the business end, the super sharp, curved blade that actually does the cutting of the thread. Think of it like a tiny, super-efficient knife just for stitches.

Now, just like your favourite pair of scissors can get a bit blunt over time, so can this little J-curve blade. If you notice it’s not slicing through the thread easily anymore, it’s probably time to treat yourself to a new seam ripper. Don’t try to force it, because that’s when accidents happen, and you might end up with a little nick in your lovely fabric. Oh, and one last thing – always pop that little cap back on when you’re not using it. Trust me, it’s easy to forget, and that sharp point can be a bit of a surprise if you’re rummaging around in your sewing box!
Basic Unpicking Techniques
Right, so now for the nitty-gritty – how to actually use this clever little unpicker! Now, just like choosing the right stitch for your fabric, the best way to tackle taking out seams really depends on what kind of material you’re working with. If it’s something delicate and fine, like silk or chiffon, you’ll want to be extra gentle and take your time. Think of it like carefully unwrapping a precious gift – you don’t want to tear the paper!
For Delicate Fabrics (and All Fabric Types):
- Turn your fabric to the wrong side.
- Use the sharp point to carefully unpick or cut the back stitches, slicing through a stitch every half inch or so.
- Flip the fabric to the right side and gently pull the thread. If it doesn’t come free, you might need to cut more stitches on the wrong side.
- Once the threads are removed, gently massage the fabric along the seam line to minimize needle punctures. Keep in mind that some fabrics, like leather, won’t recover from stitch marks.

For Pre-made Garments (and When Backstitches Are Inaccessible):
- Turn the fabric to the right side.
- Gently pull the fabric pieces apart until you can see a stitch in the seam line.
- Carefully slip the sharp point under the stitch and cut it with the J-curve.
- Continue pulling the fabric apart and cutting stitches, being careful not to snag any fabric fibres.
- Remove any loose threads and gently rub the fabric to minimize stitch holes.
Using the Ball End:
- The ball end is designed for safer thread cutting, especially on the right side of your fabric.
- Turn the seam ripper so the point is within the seam allowance and the ball end faces the right side of the garment.
- Slip the ball end under the thread and cut it. This minimizes the risk of accidentally poking your fabric.
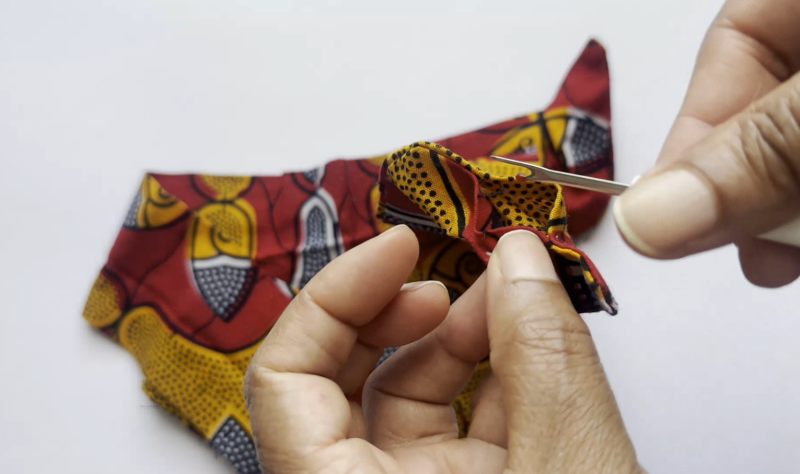
Slide Cutting:
- This technique is faster but riskier, best used on stable fabrics.
- Position the seam ripper with the point in the seam allowance and the J-curve level with the stitches.
- Gently pull the fabric towards the seam ripper to slice through the stitches.
- Clean up any loose threads.

Beyond Basic Unpicking
Seam rippers aren’t just for fixing mistakes. They’re also handy for:
- Removing Basting Stitches: Easily remove temporary basting stitches after completing a project.
- Trimming Loose Threads: Use the sharp blade to cut loose threads close to the fabric.
- Opening Buttonholes: You can slice open buttonholes by placing a pin at each end to prevent over-cutting, then carefully insert the sharp point of the seam ripper into one end of the buttonhole and slice through the stitches.

How to Avoid Damaging Fabric:
- Always use a light touch and avoid forcing the seam ripper.
- Keep the blade sharp. A dull blade is more likely to snag and tear your fabric.
- Use the red ball on the seam ripper to prevent the sharp point from digging into your fabric.
- Work slowly and carefully, especially when working with delicate fabrics.
Once you’ve got these basic moves down, you’ll find you can tackle taking out stitches without that little niggle of worry about ruining your lovely fabric. You’ll be unpicking like a seasoned pro in no time, and those little ‘oops’ moments will become much less stressful!
Advanced Seam Ripper Techniques
Once you’ve mastered the basic techniques, you can explore some more advanced ways to use your seam ripper. These techniques will come in handy for more complex sewing tasks and will help you refine your skills.
Using a Seam Ripper for Alterations:
- A seam ripper is an invaluable tool for making alterations to garments.
- You can use it to adjust the size of a garment by carefully unpicking seams and re-sewing them to the desired dimensions.
- For example, you can use a seam ripper to take in a waistband, shorten a hem, or adjust the fit of a sleeve.
- Remember to always work slowly and carefully when altering garments, and to measure twice and cut once!
Removing Embroidery or Applique:
- Removing embroidery or applique can be a delicate task, but a seam ripper can help.
- Carefully insert the sharp point of the seam ripper under the embroidery or applique stitches and slice through them.
- Use a pair of tweezers to remove any remaining threads.
- If the embroidery is dense, or on a delicate fabric, consider using a small pair of curved embroidery scissors in conjunction with the seam ripper.
Using the Seam Ripper for Pattern Adjustments:
- A seam ripper can be used to make adjustments to sewing patterns.
- For example, you can use it to add or remove seam allowances, adjust the length of a pattern piece, or modify the shape of a curve.
- This is very useful for altering pre-made patterns to better fit your own measurements.
Using the Seam Ripper to Open up Seams for Pressing:
- Sometimes, especially with thick fabrics, it is helpful to open up a seam slightly, before pressing it open.
- This allows the seam to lay flatter, and prevents bulk.
- Carefully use the point of the seam ripper to open up a small section of the seam, before pressing.
Once you’ve got these more advanced tricks up your sleeve, you’ll find your trusty seam ripper becomes even more of a superhero in your sewing box!

Caring for Your Seam Ripper
Now, just like your favourite pair of scissors or your trusty sewing machine, giving your seam ripper a little bit of love will really pay off in the long run. A tiny bit of care will help keep that blade nice and sharp and ready to tackle any unpicking task you throw its way!
Cleaning and Maintenance:
- After each use, gently wipe down your seam ripper with a soft cloth to remove any lint or thread scraps.
- If your seam ripper has a build-up of sticky residue, you can use a small amount of rubbing alcohol on a cotton swab to clean it.
- Avoid using harsh chemicals or abrasive cleaners, as these can damage the blade.
Sharpening the Blade (If Applicable):
- Some seam rippers have replaceable blades, while others can be sharpened.
- If your seam ripper has a replaceable blade, follow the manufacturer’s instructions for changing it.
- If your seam ripper can be sharpened, you can use a small sharpening stone or a honing steel.
- Be very careful when sharpening the blade, as it is very sharp.
Proper Storage:
- Store your seam ripper in a safe place where it won’t get damaged or cause injury.
- A dedicated sewing tool box or drawer is ideal.
- If your seam ripper has a protective cap, always replace it after use.
- Keep it away from children and pets.

When to Replace Your Seam Ripper:
- If your seam ripper blade becomes dull or damaged, it’s time to replace it.
- A dull blade can tear your fabric and make unpicking stitches more difficult.
- Also replace it if the tool becomes bent, or broken.
So, by giving your little seam ripper a bit of care and attention, you’ll make sure it stays a trusty and helpful friend in your sewing box for ages to come!
FAQs
Even with detailed instructions, you might still have some questions about using a seam ripper. Here are some frequently asked questions to help clear things up:
Can I use scissors instead of a seam ripper?
While you can use scissors to remove stitches, it’s generally not recommended. Scissors are more likely to cut or tear your fabric, especially delicate fabrics. A seam ripper is specifically designed for unpicking stitches safely and efficiently.
How do I avoid cutting my fabric?
The key is to use a light touch and control. Avoid forcing the seam ripper. Use the red ball on the end of the seam ripper to help prevent the sharp point from digging into your fabric. Work slowly and carefully, slicing through only a few stitches at a time.
What’s the best way to remove tiny threads?
A pair of tweezers can be helpful for removing tiny threads that are left behind after unpicking. You can also use a lint roller or sticky tape to pick up loose threads.
How do I sharpen my seam ripper?
Not all seam rippers can be sharpened. Some have replaceable blades, while others are designed to be disposable. If your seam ripper can be sharpened, use a small sharpening stone or honing steel, and follow the manufacturer’s instructions.
Is there a difference between a seam ripper and a stitch ripper?
No, they are the same tool. The terms are used interchangeably.
My seam ripper keeps snagging my fabric, what should I do?
This usually indicates a dull or damaged blade. Replace your seam ripper or sharpen the blade if possible. Also, ensure you’re using the correct technique, and not forcing the tool.

Conclusion
The seam ripper (or stitch ripper, whichever name you prefer!), might look a bit daunting at first glance, but honestly, it’s a real superstar in your sewing toolbox. It’s the key to fixing those little hiccups, making things fit just right, and generally making your projects look super professional – all without a worry about damaging your lovely fabrics once you’ve got the hang of it.
And listen, let’s be clear: every single person who sews, from absolute beginner to seasoned pro, makes mistakes. It’s just part of how we learn and get better! So, don’t be shy about reaching for your seam ripper. The more you use it, the more comfortable you’ll become, and before you know it, it’ll be your trusty sidekick, helping you create things you’ll be really proud of.
Ready for some more sewing fun and helpful tips? My free beginner’s sewing guide e-book is just a click away! Download it now.